Check Levels
REW measurements are usually made at a level of about 75 dB SPL. This is not very loud, it is the same level aimed at by most receivers to adjust speaker trims. Using very loud test signals is likely to damage your speakers and your ears. Do not use test signal levels any higher than you would be comfortable listening to for long periods. Setting the signal level REW uses during measurement involves generating a pink noise calibration signal and adjusting the AV processor's volume control and/or the calibration signal level so that at the measurement point (usually ear height at your main listening position) your SPL meter shows a level of around 75 dB. Then, if not using a USB microphone, the interface's input volume needs to be adjusted to get a good signal level from the SPL meter or mic preamp when the cal signal is playing.
With a USB microphone the input volume control can be left at the unity gain (0 dB) setting, which is selected by default when the microphone is first plugged in (and set automatically by REW if the Control input volume box is ticked on the Soundcard preferences).
Check Levels Procedure
Open the Soundcard Preferences panel and choose whether to set the levels using your subwoofer or a main speaker, making the appropriate selection in the drop-down box in the Levels panel. This tells REW whether to use a subwoofer or speaker calibration signal. If you have connected the interface output directly to your subwoofer or to an equaliser that is connected to your subwoofer choose Use Subwoofer to Check/Set Levels here, if you are connected to an AV processor input you can use the subwoofer or main speaker settings.
Press the Check Levels... button and follow the instructions on screen. The test signal defaults to an RMS Level of -12 dBFS. If connected to an AV processor, start with the volume fairly low and increase it until the meter is reading around 75 dB. The exact level is not critical. If connecting directly to an equaliser such as the BFD, use the Sweep Level control to change the level of the generated signal. In either case, the final Sweep Level will be used for subsequent measurements - remember to use the same AV processor volume setting whenever measurements are made.
If input levels are low DO NOT KEEP MAKING THE TEST SIGNAL LOUDER. Input levels should be set through the volume controls on the input path, not the output, using very loud test signals is likely to damage your speakers and your ears.
Notes on Volume Controls
The output volume control may have no effect on the level of line outputs, but will affect a headphone output or the PC's speakers - if using a true line output for the measurement signal the output volume control should be muted to prevent the signal being heard from the PC's own speaker(s).
On Windows the OS volume controls may not effect signals to/from WASAPI exclusive devices, unless the adjustment is made within the device itself.
The following notes are relevant if an output device and output have been selected in REW and the Control output volume box is enabled and ticked.
- REW sets the interface's output volume to half scale.
- The range of the REW controls is 0..1, but the underlying gain controls in the interface are generally logarithmic. If you use REW to alter the volume control settings using the arrows on the spinners, the settings will change in increments corresponding to around 0.5dB, however the interface's own controls will usually have lower resolution, so changes may have no effect on the output until the next step in the interface's control is reached.
- Changes in volume settings outside REW (e.g. in the Windows mixer) are automatically detected and reflected in REW's controls.
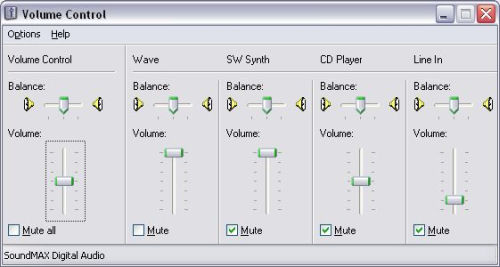
- In the playback mixer (if there is one) it is important to mute the input used for the signal from the mic or SPL meter (usually Line In), otherwise a feedback loop results as the signal picked up by the mic/meter is fed directly back to the output. Here is an example of correct playback mixer settings on a Windows XP system, only Wave is unmuted, the Wave volume is full scale and the output volume is half scale.

Trouble-Shooting Setting Input Volume
- Some interfaces do not provide an input volume control (e.g. some USB cards). If using an SPL meter or mic and preamp, as long as the signal RMS level is within the -30 to -12 dB range when the speaker/subwoofer cal signal is playing everything should work OK. If the level is below -30dB try reducing the meter range to raise the level, but be careful not to reduce the range to the point the meter is overloaded. If the level is above -12dB try increasing the meter range to lower the level.
- If using a USB mic the signal may be much lower, below -50 dB, this is normal.
- Some interfaces do not provide programmatic access to their input volume control so REW may not find a volume control or it may not be able to alter it. In that case you can use the controls in the interface's mixer or the OS audio level controls to make the required adjustments manually.
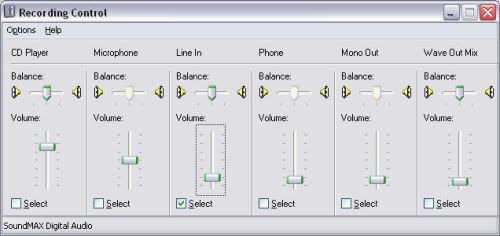
- On some interfaces REW may not be able to directly select the required input via its device and input selectors - for example, on Audigy 2 selecting the Line In is done by selecting "Analog Mix" in the Record panel of the Basic tab of the Creative Surround Mixer then going to the Source panel and muting all the sources except for Line In. If it does not seem possible to select the required input via REW's device and input selectors, or REW does not seem to be making the correct settings, leave the input device set to Default Device and make the input selection and input volume adjustments via the interface's mixer or the OS audio level controls. An example of suitable Windows XP volume control settings is shown below, with Line In selected

After checking levels the next step is to calibrate the SPL reading.